
How to lace your shoes – shoe lacing techniques
Shoelaces have been in use for thousands of years. Traditionally the laces were made from leather, jute, cotton and other such materials. Nowadays, synthetic fibers are often used.
There are numerous methods of tying shoe laces, each with its own specific features and benefits.
Knowing your foot type is important, not only for choosing the right footwear, but also to employ the right shoe lacing technique, otherwise you may fail to take full advantage of your carefully selected shoes.
Basic shoe lacing techniques
There are two basic lacing patterns, one is bar lacing and the other is cross lacing.
Bar or straight lacing is mostly employed by military personnel or for tying formal boots.
Externally, the laces run straight in parallel bars, while on the inside they pass through alternate eyelets on the same side.

Pros: Looks neat and relieves pressure on the top of the foot.
Cons: May stretch and loosen, thus compromising stability.
Crisscross lacing is more popular and is favored especially by sportspeople.
The laces run in a crisscross pattern, going under and then above the other half.
This technique is especially suited for runners to help keep their heels locked securely in position. It can also be used in combination with other lacing techniques.
Lacing for high-arched feet:
The main concern here is to tie laces so that they do not put unnecessary pressure on the top of the foot and at the same time hold the foot firm in position.
Different lacing patterns are recommended:
Start with a crisscross and when in the third eyelet, do not cross to the other side, but feed the lace through the eyelet on the same side. Then start with the crisscross again and finish with a lace lock.
In another variation, you can skip one hole in the middle, on each side and finish again with a lace lock.
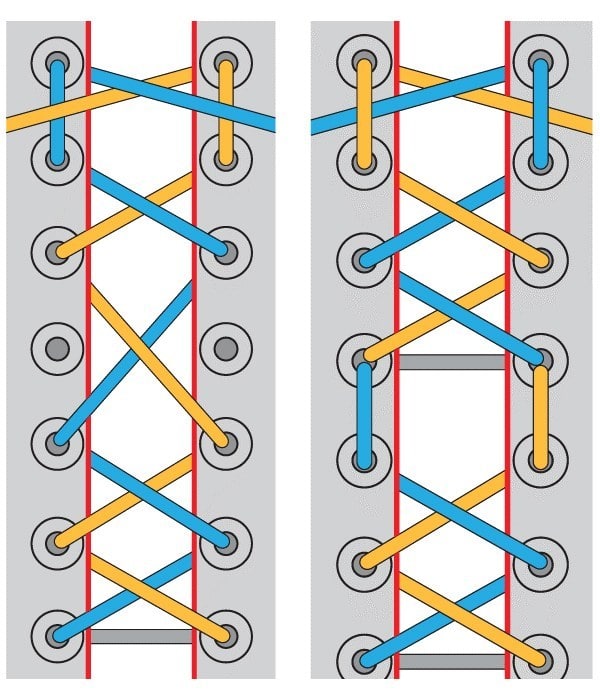
Pressure Relief in a Specific Area:
The above-mentioned technique can also be utilised to relieve pressure on a specific spot. Continue with the normal lacing and, as you get near the pressure point, skip an eyelet or feed through the eyelet on the same side. Crisscross again and finish with a lock.
Segmented Lacing:
This utilises a pair of laces for each shoe, with one lace passing through the upper half of the eyelets and the other through the bottom half. This creates segments, each with its own level of tension.
This especially helps where the forefoot is wide and the heel is narrow, or where there is cramping of the toes. The upper segment can be laced to accommodate a wider forefoot or to relieve pressure on the toes. Meanwhile, the bottom segment can be lace locked to keep the heel firmly in position, regardless of the slack upper segment.
Lacing for wider feet:
To allow room for your feet, start with the crisscross lacing technique. In the forefoot region, where you want to allow more room for the foot, do not cross, but feed the laces straight through the holes on the same side. Do this for two or three eyelets and then switch to crisscross again. Pull the laces to a comfortable level and tie the knot.
Your performance depends on the stability of your feet and that, in turn, depends on your lacing technique. An incorrect lacing technique may lead to painful feet and an increased risk of injury.


